Automatically installing Shiny and RStudio server on a Raspberry Pi with Ansible


I have a related post about manually installing Shiny and RStudio server on a Raspberry Pi but even with the latest advancements in software support for the ARM architecture, this process is still considerably time-consuming and requires a lot of copy/pasting and watching the terminal waiting for one task to be completed to be able to start with the next one, so, I decided to come up with a better solution, and that is to automate the process so it can be left unattended and come back later when it’s done.
To automate the installation and configuration process I decided to use Ansible, those in DevOps must be familiar with the power of Ansible but even if you’ve never heard of it, don’t worry, you don’t need to know Ansible in order to take advantage of its automation capabilities, I’m not an Ansible expert myself and I’ve been capable of accomplishing this project with just basic knowledge of the tool, so if I can do it, so can you. I’m going to guide you through the process assuming you have no prior experience with this tool and just some basic Linux terminal skills.
Ansible is an open-source software provisioning, configuration management, and application-deployment tool enabling infrastructure as code. It runs on many Unix-like systems, and can configure both Unix-like systems as well as Microsoft Windows. In layman’s terms, it lets you automate tasks in your infrastructure (One, or many Raspberry Pi SBCs at once in our case) by defining a set of steps to execute in YAML files called “playbooks”. I took one for the team and wrote some Ansible playbooks to automate most of the installation process but leaving some room for you to configure the installation to your liking via a config file, so you don’t need to modify the playbooks (which will require you to know how they work) . Although, if you want to have a basic understanding of how this tool works, there is a nice Ansible 101 series on Jeff Geerling’s YouTube channel and if you are the kind of people that prefer reading rather than seeing things, here is a nice Ansible Tutorial for Beginners.
✏️ Note that this has only been tested with the software versions specified in the
config_vars.ymlfile, it is very likely that it will still work out of the box with newer software versions, but in some cases, it might require some modifications to the playbooks that I will made as soon as I notice the problem.
Prepare the Raspberry Pi
Even if most of the process can be automated with Ansible, we still need at least one working Raspberry Pi to configure, so, we need to start by flashing an Operating System (OS) onto an SD card (I recommend at least 32GB class 10 HC1). Have in mind that RStudio Server is compatible only with arm64 operating systems, so if you want to be able to install it, you will have to choose a 64-bit OS, the playbooks work with Raspberry Pi OS, and Ubuntu as well.
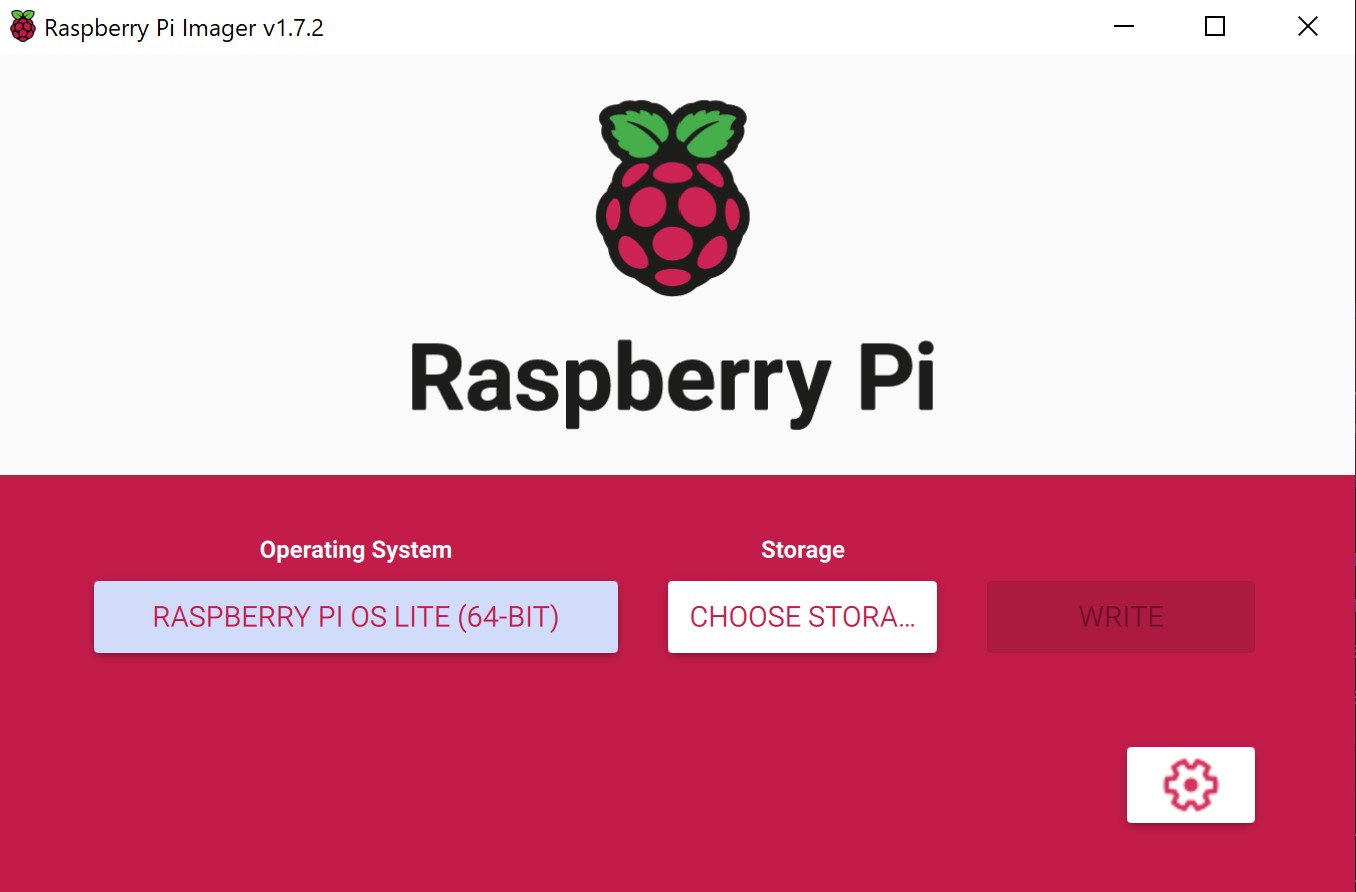
Download “Raspberry Pi Imager” from the official site and install it in your system, execute “Raspberry Pi Imager”, choose a suitable OS, choose the “SD Card” and press “Write”.
Once the process is done, you have a clean installation of an operating system on your micro SD card, insert the card into your Raspberry Pi, plug in a keyboard and a screen, and turn it on.
Log into the system (the default user and password are pi and raspberry for Raspberry Pi OS, and in Ubuntu is ubuntu for both user and password) and run an initial system update with these commands:
Next, you need to set a static IP for the Pi so you can easily find it on your network later on.
For setting a static IP on Raspberry Pi OS, run these commands. This is a sample IP configuration for a wired connection, modify accordingly with your own needs:
# Sample static IP configuration:
sudo nmcli c mod 'Wired connection 1' ipv4.addresses 192.168.3.101/24 ipv4.method manual
sudo nmcli con mod 'Wired connection 1' ipv4.gateway 192.168.3.1
sudo nmcli con mod 'Wired connection 1' ipv4.dns "192.168.3.1"
sudo nmcli c down 'Wired connection 1' && sudo nmcli c up 'Wired connection 1'
Then you have to stablich a new SSH connection with your Pi since the IP has changed.
And for setting the IP on Ubuntu, you have to create this file sudo nano /etc/netplan/01-netcfg.yaml, add the content below (edit as needed), and apply the configuration with sudo netplan apply.
network:
    version: 2
    renderer: networkd
    ethernets:
        eth0:
            dhcp4: false
            addresses:
                - 192.168.3.101/24
            nameservers:
                addresses: [8.8.8.8, 8.8.4.4, 192.168.3.1]
            routes:
                - to: default
                  via: 192.168.3.1
Then we need to set some basic configurations with raspi-config. Run sudo raspi-config, and perform the following tasks (In Ubuntu you need to install it first with sudo apt install raspi-config):
- Optionally, change the password for the “pi” user (System Options –> Password)
- Enable the SSH server (Interface Options –> SSH)
- Set your locale settings (Localization Options)
- Expand the filesystem to use the full capacity of your SD card (Advanced Options –> Expand Filesystem)
- Disable Predictable Network Interface Names (Advanced Options –> Network Interface Names)
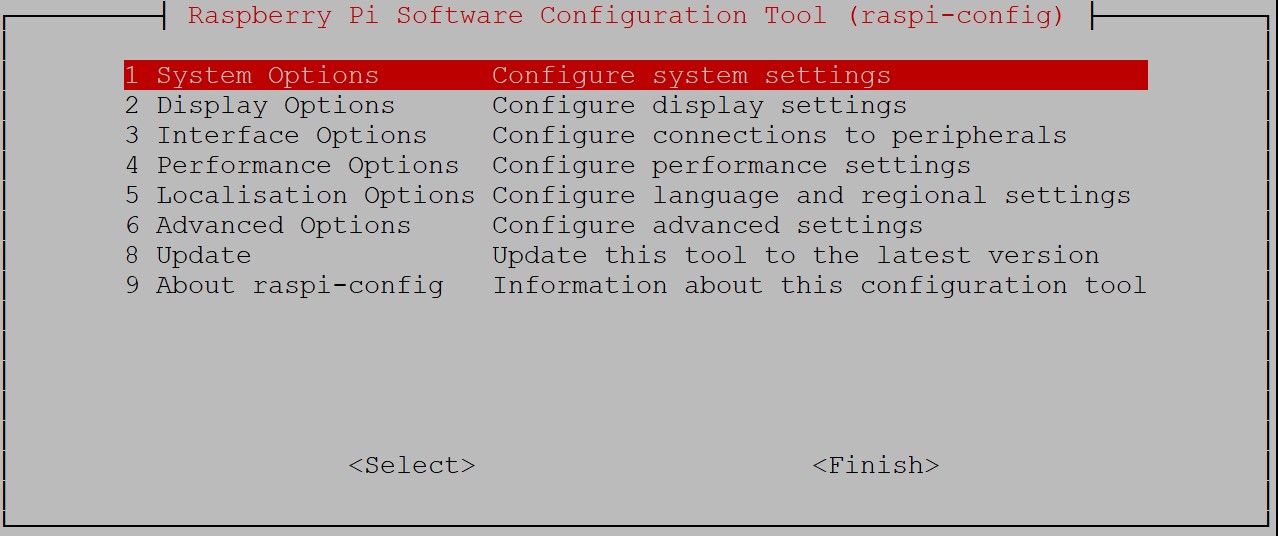
When you are done, exit the raspi-config tool and reboot your Pi.
If you don’t have one, you need to create an SSH key, even if it is possible to use Ansible by providing a password for your hosts interactively, a more convenient and secure way to do it is by using an SSH key pair. To create one run the following commands in the terminal:
# Create the .ssh folder
cd ~
mkdir .ssh
cd .ssh
# Create the authorized_keys file
touch authorized_keys

# Set proper access permissions
chmod 700 ~/.ssh
chmod 600 ~/.ssh/authorized_keys

# Create the key pair
ssh-keygen
# Add the new key to the authorized_keys file
cat id_rsa.pub >> authorized_keys

# If you use Putty as your SSH client (Windows), generate a ppk key, otherwise, ignore these steps
sudo apt install putty-tools
puttygen id_rsa -o id_rsa.ppk
Copy the id_rsa and id_rsa.pub (and id_rsa.ppk if applicable) files to the machine you are going to use to execute the playbooks, I like to use sftp but you can do it the way you prefer (e.g. with a USB memory). After you have copied the key files, delete them from your Pi with rm ~/.ssh/id_rsa*. If you already have an SSH key, I trust you know how to add it to your OS at flashing time using the Raspberry Pi Imager software.
Now your Pi is ready to go, disconnect the keyboard and monitor and plug the Pi into your network (I recommend using a wired connection).
Install Ansible
In theory, you could install Ansible on the Raspberry Pi itself and run the playbooks directly on it with connection: local but it wouldn’t be practical, it is better to run the playbooks from a computer other than your Pi.
For installing Ansible, if you have a Unix based system (i.e. Linux, macOS) at your disposal, you are golden, installing Ansible is very simple:
# Install python3
sudo apt install python3 # On macOS use `brew install python3`
# Install pip3
sudo apt install python3-pip
# Install Ansible version 9.5.1 (for reproducibility) with pip3
sudo pip3 install ansible==9.5.1 --break-system-packages
If you are on Windows, sadly, there is no way to run Ansible natively, your best bet is to enable WSL (Windows Subsystem for Linux), install a Linux distribution from the Microsoft Store (I recommend Ubuntu), and execute the previous steps in your Linux VM.
A detailed guide for installing WSL can be found here and more information about installing Ansible can be found on the official documentation site.
Also, since we are going to be installing several packages from source on a low power SBC, some of these tasks are going to take a while and the SSH connection might get automatically closed due to inactivity, to prevent this situation, activate the sending of “keep-alive” packets to the server by editing the ssh_config file on the computer running Ansible, run sudo nano /etc/ssh/ssh_config and add these two lines under Host *:
⚠️ Is very important not to skip the previous step, otherwise, the SSH connection migth silently fail while running long tasks in Ansible and you are going to be waiting pointlessly with your Raspberry Pi doing nothing in reality.
Download and Configure the Playbooks
The playbooks are on a public repository on GitHub, you can clone the repository with these commands:
# Install git if you don't have it already
sudo apt install git
# Clone the latest commit from the repository
git clone https://github.com/andresrcs/raspberry_pi_server.git --depth 1
Ansible doesn’t run playbooks in “world writable folders” so you need to set the raspberry_pi_server folder permissions to 755.
Have in mind that on WSL it is necessary to remount the C drive in order to be able to change file permissions so you have to do this before changing permissions:
To configure the playbooks, you first need to define your “inventory”, this is a list of the hosts you are going to connect to, edit the raspberry_pi_server/inventory.ini file and add the IP of your Raspberry Pi(s):
[raspberries] # This represents a group of Raspberries
raspberry_01 ansible_host=192.168.18.101 # This is the hostname and IP for an individual Raspberry Pi
# You can add as many Raspberries as you need
Then set common variables for your [raspberries] group by editing the raspberry_pi_server/group_vars/raspberries.yml file, the most important things to check here are the path to your ssh key and the default user fot the operating system you are using.
---
ansible_user: pi # This is the default user for the operating system
ansible_become_method: sudo
ansible_python_interpreter: /usr/bin/python3
ansible_ssh_private_key_file: ~/.ssh/raspberrypi_key # The location of the ssh key in the computer runing Ansible.
Now, you can set installation options by editing the variables in the raspberry_pi_server/vars/config_vars.yml file, most of the already set options are fine for most use cases including reasonable security settings but at the bare minimum, you need to set your personal password for the PostgreSQL main user. You can also choose your preferred method for installing R, if you don’t want to use the default option, have in mind that using the R4Pi Project option is only possible with Raspberry Pi OS and it will always install the latest R version available.
# System Configurations ########################################################

# Swap parameters
swap_file_path: /var/swap.1
# Use any of the following suffixes
# c=1
# w=2
# b=512
# kB=1000
# K=1024
# MB=1000*1000
# M=1024*1024
# xM=M
# GB=1000*1000*1000
# G=1024*1024*1024
swap_file_size: 3GB
swappiness: '10'

# Install Nginx?
install_nginx: true

# Install PostgreSQL?
install_postgresql: true

# Security Configurations ######################################################

# Ports to open
exposed_ports:
  - { rule: 'allow', port: 22, proto: 'tcp' }     # ssh
  - { rule: 'allow', port: 22, proto: 'udp' }     # ssh
  - { rule: 'allow', port: 80, proto: 'tcp' }     # http
  - { rule: 'allow', port: 5432, proto: 'tcp' }   # Postgresql (ommit if Postgresql is not installed)
  - { rule: 'allow', port: 5432, proto: 'udp' }   # Postgresql (ommit if Postgresql is not installed)
  # - { rule: 'allow', port: 8787, proto: 'tcp' } # RStudio Server (uncomment if Nginx is not installed)
  # - { rule: 'allow', port: 3838, proto: 'tcp' } # Shiny Server (uncomment if Nginx is not installed)

# Password for the main PostgreSQL user (ignore if PostgreSQL is not installed)
postgres_password: 'very_secure_password'

# Access rules for Postgresql (ignore if PostgreSQL is not installed)
postgresql_rules:
  - { contype: local, users: postgres, address: samehost, method: trust }
  - { contype: local, users: all, address: samehost, method: trust }
  - { contype: hostssl, users: all, address: 0.0.0.0/0, method: scram-sha-256 }
  - { contype: host, users: all, address: 0.0.0.0/0, method: scram-sha-256 }
  - { contype: hostssl, users: all, address: '::0/0', method: scram-sha-256 }
  - { contype: host, users: all, address: '::0/0', method: scram-sha-256 }
  - { contype: host, users: all, address: 127.0.0.1/32, method: scram-sha-256 }
  - { contype: host, users: all, address: '::1/128', method: scram-sha-256 }

# Main Software Versions #######################################################

# R version to install
use_r4pi: true # If set to true the latest R version will be installed, this is only compatible with
                # Raspberry Pi OS.
use_rig: false # Don't forget to specify an R version in the following line
r_version: '' # (e.g. '4.3.3') Currently, you can only choose the R version if it's going to be
                   # installed with rig or compiled (with both 'use_r4pi' and 'use_rig' set as false).

# Shiny-server version to install
shiny_server_version: 'v1.5.21.1012'

# RStudio version to install
rstudio_version: '2024.04.0-daily+651'
Run the Playbooks
Under ideal conditions, like using the latest Raspberry Pi model with 8GB of RAM, booting from an SSD drive and connected to a stable network, you could simply access the raspberry_pi_server folder and run the site.yml playbook to install everything at once:
But under less than ideal conditions it is very likely tha you will encounter some random erros caused by overloading the Pi or unestable network connections, so, to mitigate this issue and to make the installation process more flexible, I have divided the process into three individual playbooks:
cd raspberry_pi_server
ansible-playbook install_basic_services.yml
ansible-playbook install_shiny_server.yml
ansible-playbook install_rstudio_server.yml
If you decide that you only need Shiny server or RStudio server but not the other, or you already have installed the support services you want, you can run only the playbooks you need.
If you want to update something in the future, like R, RStudio, or Shiny server (I can’t guaranty that is always going to work out of the box), you can simply change the version in the config file and run the specific part of the playbook by taking advantage of the defined “tags”.
For example, this will only install the R version defined in the config file and nothing more:
The available tags are:
- install_basic_services.yml
secure: Set security settings on the serverswap: Add swap memory to the servernginx: Install and configure Nginx + PHPpostgresql: Install and configure PostgreSQLr: Install R from sourcedisable_wifi: Disable Wifi and Bluetooth module
- install_shiny_server.yml
shiny-server: Install shiny-server from sourceconfigure_shiny: Configure shiny-server
- install_rstudio_server.yml
rstudio: Install RStudio server from sourceconfigure_rstudio: Configure RStudio server
You can also go the other way and skip specific parts of the playbooks by using the --skip-tags option, for example, if you don’t need PostgreSQL, you can avoid installing it by running the playbook this way:
After successfully running all the playbooks, you will have a fully functional installation ready to be used, so you could simply open an RStudio session at http://your_server_ip/rstudio and/or publish your Shiny apps in the /srv/shiny-server folder and access them at http://your_server_ip/shiny/your_app_name.
⚠️ If the Nginx configuration hasn’t been set by the
install_basic_services.ymlplaybook because you have omitted it, you have to configure the reverse proxy manually or access the services with their specific port, e.g.http://your_server_ip/3838/your_app_name, this would also require you to open the corresponding port in the firewall.
Final Notes
Even with the automation, installing natively is still going to take much longer than, for example, using containers, especially if you are using a low RAM Raspberry Pi SBC (< 4GB) but since it is automatized, you can simply let it running and come back later, and you will enjoy the simpler manageability of a native installation.
Also, be aware that the installation process is going to push your Raspberry Pi to its limits so you can expect some random errors, but that doesn’t mean it’s not going to work, just restart your Pi, rerun the problematic playbook and see if it works the second time. I have done my best to make this functional in the long run by setting specific software versions but it is still possible that a system library update might break the playbooks, if you find any issues, please go to the GitHub repository for the playbooks and file an issue report, or even better, if you know how to fix it, make a pull request.
As a final comment, I want to point out that this approach can be further extended accordingly to your own needs, for example, you can implement automatic restoration of your server including deployed content. For example, I have an additional playbook to restore the applications, services, and databases I normally run on my Raspberry Pi, so in the event of a catastrophic failure, I can get back to a working state in a short period of time and with little effort, compared with doing a manual restoration of my system.